Introduction
Commercial flat roofs in Southeast Texas face intense storm exposure — from Gulf hurricanes to hail-laden squalls — and even moderate storms can cause damage that isn't visible from the ground. Facility managers across Houston, Conroe, and Galveston know firsthand how quickly a roof that looked fine yesterday can develop leaks after a strong storm blows through.
Flat roofs are uniquely vulnerable compared to sloped roofs. Their low pitch traps water, membrane edges are exposed to wind uplift, and hidden damage often goes unnoticed until leaks appear inside the building — by which point the repair bill has multiplied.
According to industry data, roofs with regular maintenance last an average of 8 years longer than those managed reactively, which is why post-storm inspections consistently pay for themselves.
That starts with knowing what to look for. This guide walks commercial property owners through identifying storm damage types, conducting a safe post-storm inspection, choosing the right repair approach, and knowing when replacement makes more sense than patching.
Key Takeaways
- The most common damage types: membrane edge uplift, hail punctures, flashing tears, and ponding from blocked drains
- Start with ground-level and interior inspections before accessing the roof — don't go up until conditions are safe
- Document everything with photos before repairs to support insurance claims
- Repair options range from temporary patching to membrane re-seaming, flashing replacement, and coating systems
- Isolated damage is typically repairable — widespread failure or saturated insulation usually means replacement
Types of Storm Damage to Commercial Flat Roofs
Flat roofs face four primary categories of storm damage, each with distinct causes and warning signs that determine the repair response needed.
Wind Uplift and Membrane Damage
Wind creates differential pressure above and below a flat roof membrane, lifting edges away from the substrate — particularly at corners, perimeters, and penetrations. Even winds of 40–50 mph can loosen improperly adhered membrane edges on TPO, EPDM, and modified bitumen roofs.
Wind scouring strips granules or gravel ballast from the surface, gradually degrading UV protection without obvious visual indicators. By the time this damage becomes apparent, the membrane underneath has already begun to deteriorate.
Common wind damage locations:
- Perimeter edges and corners where uplift forces concentrate
- Roof-to-wall transitions and parapet caps
- Around HVAC units and roof penetrations
- Field seams on mechanically attached systems
Hail Impact and Punctures
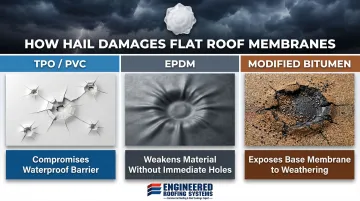
Hailstones can puncture or bruise single-ply membranes and modified bitumen, leaving small holes that are often invisible until water infiltrates. Hail damage is especially deceptive on flat roofs because the surface appears intact from a distance.
The damage only becomes apparent during close inspection or after interior leaks develop.
On TPO and PVC membranes, hail creates small punctures or fractures that compromise the waterproof barrier. EPDM tends to show bruising that weakens the material without creating immediate holes. Modified bitumen surfaces may show granule loss or impact craters that expose the base membrane to accelerated weathering.
Water Ponding and Drainage Failure
Heavy storm rain can overwhelm or clog drainage systems, causing water to pond in low spots. Flat roofs are designed with a slight slope to drain; storm debris blocking drains or scuppers reverses this. Ponding water accelerates membrane degradation, increases structural load, and finds its way into any existing crack or seam.
Key drainage issues after storms:
- Clogged drains filled with leaves, branches, and roof debris
- Scupper blockages preventing water flow
- Structural deflection creating new low spots
- Saturated insulation adding unexpected weight
Flashing Tears and Debris Impact
Storm-force debris (branches, signage, and loose HVAC equipment) can tear flashing at roof edges, vents, skylights, and mechanical penetrations. Flashing failures are a leading cause of post-storm leaks because they compromise the seal at the most vulnerable transition points on the roof.
Metal edge flashing can bend, detach, or tear completely away. Pipe boot seals crack under impact. Skylight curb flashing separates from the membrane. These failures allow water to bypass the membrane entirely, channeling directly into the building envelope.
Step-by-Step Post-Storm Flat Roof Inspection
A thorough inspection must happen before any repair work begins. Attempting to fix a flat roof without first mapping all the damage leads to missed problems and repeat failures. Safety comes first: never access a wet or structurally compromised roof.
Step 1: Start With an Interior and Ground-Level Check
Before climbing onto the roof, inspect ceilings, walls, and the interior of the facility for water stains, drips, or discoloration. Note their location to help pinpoint where the roof breach is above.
Then walk the perimeter of the building to look for:
- Visible membrane displacement or lifted edges
- Fallen debris on the roof
- Detached flashing
- Damage to gutters, downspouts, and parapet walls
Step 2: Assess the Roof Surface Safely
Once conditions are stable and dry, access the roof wearing appropriate footwear. Work across the entire surface in sections.
Look for:
- Membrane blisters, bubbles, tears, and lifted edges
- Punctures or impact damage
- Seam separation or open joints
- Damage concentrated at penetrations (HVAC units, vents, pipes)
- Perimeter edge failures where wind uplift damage concentrates
Avoid standing water, which can conceal soft or weakened areas underneath.
Step 3: Check Drainage and Structural Components
Clear and inspect all drains, scuppers, and gutters for storm debris blockages. Test whether water is draining freely — pour water into the drain and observe flow.
Look for visible sagging or deflection in the roof deck, which can indicate water-saturated insulation below the membrane. You can't spot this from the surface alone — probe soft areas or request infrared scanning to confirm the extent.
Step 4: Document All Damage Thoroughly
Once you've completed the physical assessment, photograph every area of concern from multiple angles before touching anything. Note the location, size, and type of each issue on a simple roof diagram or sketch.
This documentation is essential for:
- Insurance claims processing
- Guiding the contractor during repair assessment
- Establishing a baseline for future inspections
- Supporting warranty claims if applicable
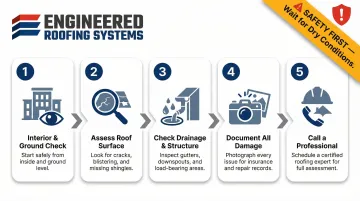
Step 5: Call a Commercial Roofing Professional for a Full Assessment
While an owner or facility manager can complete a preliminary walk-through, a licensed commercial roofing contractor has the tools, access equipment, and experience to find hidden damage (soaked insulation, compromised seams, sub-membrane moisture) that a surface walk-through won't reveal.
A professional inspection report also carries real weight with insurance adjusters. Engineered Roofing Systems produces detailed written reports with photographs and a recommended repair scope — documentation built to support claims and give property owners a clear path forward.
How to Repair Storm-Damaged Flat Roofs
The right repair method depends entirely on the type and extent of damage found during inspection. Attempting a one-size-fits-all patch without diagnosing the root cause leads to recurring leaks and unnecessary expense.
Temporary Emergency Repairs
When permanent repair must wait — contractor availability, insurance approval, or weather delays — temporary measures can prevent further damage:
- Apply roof tarps over large tears or exposed areas
- Use temporary sealant over punctures
- Tape down lifted membrane edges
- Clear blocked drains immediately
These are not permanent fixes. Leaving them too long risks worsening the underlying damage and voiding insurance coverage.
Repairing Wind-Lifted Membrane Edges and Seams
Membrane re-adhesion follows a straightforward process:
- Cleaning and drying the affected area thoroughly
- Re-adhering lifted membrane sections using compatible bonding adhesive or heat welding (for TPO and PVC)
- Re-sealing seams with appropriate tape or welded patches
- Re-fastening or replacing perimeter metal edge flashing if bent or detached
Proper adhesion is critical. Adhesive must be compatible with the existing membrane type, and heat-welded seams require proper temperature and technique to create a waterproof bond.
Patching Punctures and Hail Damage
Small punctures or bruises can be repaired with compatible membrane patch material — cut to size, bonded with adhesive or heat-welded, and sealed at the edges.
Critical requirement: Patch material must be compatible with the existing membrane type (TPO to TPO, EPDM to EPDM, PVC to PVC) to ensure a lasting bond. Mixing materials leads to adhesion failure and recurring leaks.
Restoring Drainage and Flashing
Effective drainage restoration includes:
- Clearing and flushing all drains and scuppers
- Reseating or replacing clogged drain assemblies
- Re-sealing or replacing flashing at all penetrations and roof edges
Flashing failures are often the primary source of post-storm interior leaks. Even if the membrane appears intact, compromised flashing allows water to bypass the waterproof barrier entirely.
Roof Coating Systems as a Repair and Restoration Solution
For roofs with widespread surface degradation — granule loss, minor cracking, and aging membranes — a commercial roof coating system can restore the membrane's waterproof integrity, reflect UV heat, and extend the roof's service life without a full tear-off.
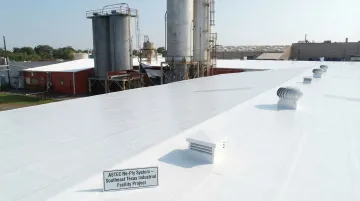
Engineered Roofing Systems applies the ASTEC Re-Ply Roof System, a seamless fluid-applied membrane installed directly over existing roofs. This system delivers:
- Flexible elastomeric membrane that expands and contracts with temperature changes
- UV resistance through ceramic reflective technology
- Resistance to ponding water, corrosion, salt spray, and environmental contaminants
- Cool roof performance that reflects sunlight and reduces energy costs
This is a cost-effective repair path for roofs that are structurally sound but showing broad storm wear. Projects completed across Southeast Texas — including Sniper Drilling Motors, Navasota Fire Station, and Pelican Packaging — demonstrate the system's effectiveness in restoring storm-damaged commercial roofs.
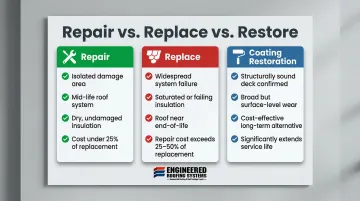
Repair vs. Replace: Making the Right Call After a Storm
Not every storm-damaged flat roof needs full replacement — but misidentifying a failing roof as merely "repairable" leads to compounding damage and escalating costs. The decision should be based on age, extent of damage, insulation condition, and long-term cost-effectiveness.
Repair When Damage Is Isolated and the Roof Is Mid-Life
If damage is localized — a few punctures, a torn flashing section, a single lifted seam — and the roof is less than two-thirds of its way through its expected lifespan, targeted repairs are typically the right call.
A roof in otherwise good condition will respond well to proper repairs and continue delivering years of service. This is especially true when the underlying insulation and deck remain dry and structurally sound.
Replace When Damage Is Widespread or the Roof Is Near End-of-Life
Industry standards dictate that when repair costs exceed 25% to 50% of full replacement cost, replacement becomes the most cost-effective path long-term. The National Roofing Contractors Association confirms this threshold and recommends replacement when leakage becomes intolerable or damage begins affecting structural components.
Replacement triggers include:
- Multiple seams compromised across large areas
- Water-saturated insulation (must be replaced, not dried)
- Membrane failing in multiple locations
- Roof within 3-5 years of expected end-of-life
Replacement resets the lifespan, provides a new manufacturer warranty, eliminates emergency failure risk, and gives you a clean starting point for preventative maintenance.
The Middle Path: Re-Roof and Coating Restoration
In some cases, a complete tear-off isn't required. A re-roof (new membrane installed over the existing one) or a full coating restoration can bridge the gap between spot repair and full replacement.
This option works when the roof deck is structurally sound and the existing membrane provides a stable base. Coating systems like ASTEC Re-Ply can be applied over existing TPO, EPDM, or modified bitumen roofs — creating a continuous waterproof barrier without the cost or disruption of a full tear-off.
Factor in Insurance Coverage and Warranty Implications
If the roof is under a manufacturer warranty, storm damage repairs should be handled by an authorized contractor to preserve coverage. Engineered Roofing Systems is an authorized contractor for Versico, Carlisle, Duro-Last, and ASTEC, ensuring that repairs maintain warranty protection.
Insurance settlements can favor replacement over repair when an adjuster determines damage is too extensive. A professional damage assessment strengthens your claim — look for documentation that includes:
- Photographs of all affected areas
- Written repair scope with material specifications
- Moisture readings from insulation and deck areas
- Contractor-prepared cost estimates for both repair and replacement options
Preventing Future Flat Roof Storm Damage
Storm-proofing a flat roof is a year-round commitment, not something done the day before a storm warning. Regular maintenance is the single most effective way to reduce storm vulnerability and extend roof life.
Key preventive actions:
- Schedule professional inspections at least twice a year and after every major storm
- Keep all drains and scuppers clear of debris
- Ensure membrane edges and flashing are properly adhered and re-secured annually
- Address minor deterioration before it becomes a post-storm failure point
Engineered Roofing Systems offers long-term commercial roof maintenance programs for Southeast Texas properties that include routine inspections, minor repairs, and priority post-storm response. That kind of ongoing support pairs well with proactive pre-season work — flashing re-securing, drain clearing, and seam re-sealing should all be completed before hurricane season begins.
Investing in a quality roof coating before storm season can measurably improve a flat roof's resistance to wind uplift, UV degradation, and water intrusion — and lower cooling costs year-round.
The ASTEC Re-Ply system's flexible elastomeric performance and resistance to ponding water make it a strong fit for Southeast Texas's hurricane-prone climate. The system also supports renewable warranty coverage, which gives building owners a cost-effective path to maintaining manufacturer-backed protection without a full roof replacement.
Frequently Asked Questions
What is the average cost to repair a flat roof?
Commercial flat roof storm repair costs vary widely based on damage type, extent, and material. Minor puncture repairs may cost $500–$2,000, while widespread membrane damage can range from $5,000–$15,000. A new TPO membrane replacement in the Greater Houston area costs between $6.00 and $8.00 per square foot. Early intervention after storms keeps costs much lower than deferred repairs.
Does homeowners insurance cover flat roof storm damage?
Most commercial property insurance policies cover storm-related flat roof damage. Coverage depends on policy terms, documentation quality, and whether you can demonstrate the damage was storm-caused rather than deferred maintenance. Detailed photo documentation and professional inspection reports strengthen claims.
What is the average life span of a flat roof?
Flat roof lifespan depends on material type. TPO membranes last 15–30 years depending on thickness, while EPDM can last up to 40 years with premium thickness. Modified bitumen typically lasts 20–25 years, and built-up roofing (BUR) 15–30 years. Lifespan informs the repair vs. replace decision after storm damage.
Can a roofer repair a flat roof when it's 45 degrees out?
Cold temperatures affect adhesive bonding and membrane flexibility. Heat-welded TPO and PVC seams require minimum temperatures of 40–50°F for proper bonding, while many adhesive applications require 50–60°F. Some cold-weather adhesives work down to 25°F. Temporary measures like tarps and mechanical fastening can hold until conditions improve.
How soon after a storm should I get my flat roof inspected?
A post-storm inspection should happen as soon as it is safely possible — ideally within 24–72 hours. Water intrusion through unaddressed damage compounds quickly, and prompt documentation is critical for timely insurance claims. Delayed inspections allow hidden damage to worsen and may complicate claims processing.
What are the signs that storm damage has compromised my flat roof's insulation?
Soaked insulation typically cannot be identified from the surface alone. Signs include soft or spongy areas underfoot, interior moisture even after the membrane appears intact, visible sagging or deflection, and increased energy costs. Professional infrared scanning can detect trapped moisture within the insulation layer — and saturated insulation must be replaced, not dried, for a lasting repair.
Storm damage doesn't wait — neither should your inspection. Engineered Roofing Systems provides post-storm inspections, repair services, and long-term maintenance programs across Houston, Conroe, Galveston, and surrounding Southeast Texas. Call 281-404-2211 to schedule a free roof assessment.